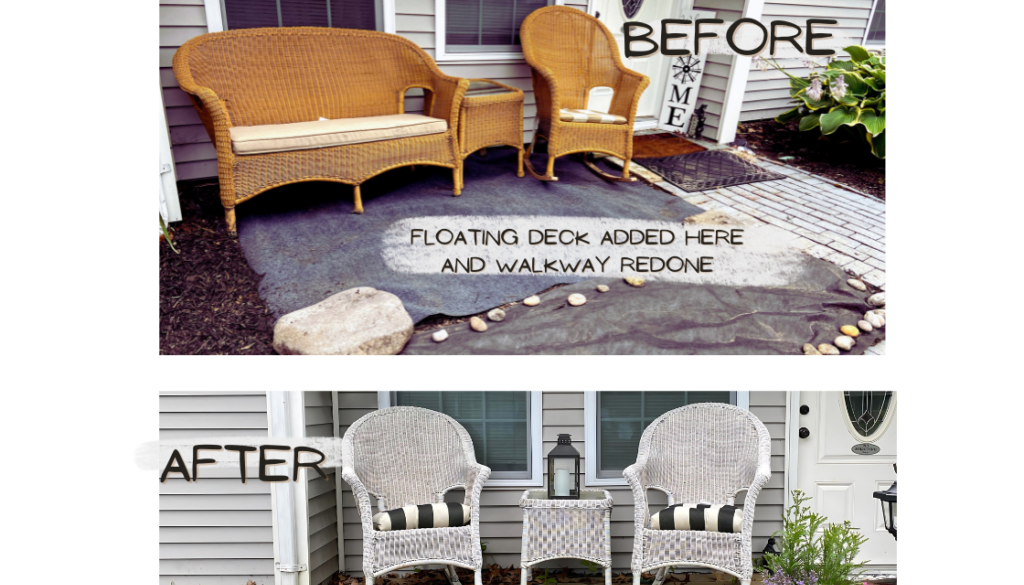
Breathe New Life into Your Patio: The Ultimate Guide to Upcycled Plastic Wicker Chairs with DIY Dalia!
Introduction
Hey there, DIY enthusiasts and patio party people! Are your plastic wicker chairs looking a little worse for wear after a long winter (or let’s be honest, a wild summer BBQ)? Don’t toss them to the curb just yet! With a little creativity and some elbow grease, you can transform those tired chairs into the stars of your outdoor space. Innovate, Create, and Elevate your patio experience as we dive into the world of upcycled plastic wicker chair magic and explore some exciting DIY projects! This guide will provide you with all the upcycling ideas and home improvement tips you need to get started.
Materials You’ll Need for These DIY Projects
Before you dive into this upcycling adventure, gather all the necessary materials. Having everything on hand will make your DIY project smooth and enjoyable. Here’s a list of what you’ll need:
- A bucket
- A soft-bristled brush
- Mild dish soap or non-bleach laundry detergent
- Warm water
- White vinegar
- A spray bottle
- Drop cloths or plastic sheeting
- Painter’s tape (optional)
- Primer suitable for plastic
- Sandpaper (optional)
- Spray paint in your desired color(s)
- Clean cloths
With these materials ready, you’re set to begin your journey of turning worn-out chairs into stunning pieces of art. Let’s dive into the details of each step!
Step 1: Banishing the Dirt and Grime for DIY Projects
Before we unleash your inner artist, it’s essential to give those chairs a good scrub. Here’s how to make a cleaning solution that’s tough on grime but gentle on plastic for this simple yet effective DIY project:
- Gather your warriors: Grab a bucket, a soft-bristled brush (think gentle on those wicker weaves!), some mild dish soap (or non-bleach laundry detergent, if you’re out of dish soap), and warm water.
- Mix it up: In your bucket, combine one tablespoon of your chosen cleaning agent with two cups of warm water. Stir it well until you see some good suds forming – that’s the cleaning power we’re after!
- Scrub-a-dub-dub: Now comes the fun part! Dip your brush into the soapy mixture and gently scrub the chairs. Focus on those nooks and crannies where dirt loves to hide.
Pro Tip: Mildew Melter
Living in a humid climate? Fret not! Add one part white vinegar to your cleaning solution. Vinegar is a natural disinfectant and can help prevent mildew growth, keeping your chairs sparkling clean for longer. These upcycling ideas not only improve your outdoor furniture but also contribute to your home improvement efforts.
Step 2: Taming Stains and Mildew with Vinegar Power and Upcycling Ideas
For stubborn stains or lingering mildew, we’ll create a dedicated solution to continue your DIY project journey:
- Vinegar Power: Mix one part white vinegar with three parts water in a spray bottle.
- Spray and Wipe: Generously mist the affected areas with your vinegar solution. Let it sit for a few minutes, then gently scrub with a soft brush or rag. Rinse the area with clean water and dry thoroughly with a clean cloth.
Important Note: Stay away from harsh abrasives like steel wool or scouring pads. These can scratch the plastic surface of your chairs, leaving them looking worse than before.
Step 3: Prime Time for Painting Perfection in Home Improvement
Now that your chairs are sparkling clean, it’s time to prime them for a paint makeover! Here’s how to create a canvas that will make your paint job pop, adding another notch to your home improvement belt:
Materials Checklist: Before diving in, make sure you have everything you need:
- Drop cloths or plastic sheeting (to protect your work surface)
- Painter’s tape (optional, but helpful for creating clean lines)
- Primer suitable for plastic (check the label to ensure compatibility)
- Sandpaper (optional, for very smooth surfaces)
- Spray paint in your desired color(s)
Setting the Stage: Lay down your drop cloths or plastic sheeting to protect your workspace. If you’re planning on painting intricate designs, use painter’s tape to mask off any areas you want to remain the original color.
Prime Time: Shake that can of primer well! Apply a thin, even coat of primer using a sweeping motion. Avoid spraying too much in one spot; multiple thin coats are better than one thick gloopy mess. Let the primer dry completely before applying the next coat (refer to the can’s instructions for drying times).
Spray Painting Tips:
- Shake, Rattle, and Roll: Always shake the spray paint can thoroughly before use. This ensures even color distribution and prevents splatter.
- Light Layers are Key: Apply multiple thin coats of paint for a smooth, even finish. Avoid the urge to drench the chair in one go – it will likely drip and create an uneven mess.
- The Art of Distance: Hold the spray paint can about 12 inches away from the chair as you spray. This will help prevent paint buildup and drips.
- Let it Breathe: Allow each coat of paint to dry completely before applying the next. This prevents the paint from smudging or peeling.
Step 4: The Grand Finale – Curing Your Upcycled Masterpiece with DIY Projects
Congratulations! You’ve painted your plastic wicker chairs, and they’re looking fabulous. But before you throw an impromptu patio party, there’s one crucial step: letting the paint cure completely. Curing allows the paint to fully harden and adhere to the plastic surface. Remember, DIY Dalia’s philosophy is to “Innovate, Create, and Elevate” every corner of your space. Refer to the spray paint can’s instructions for specific curing times. Generally, it’s best to wait at least 24-48 hours before using or moving your newly upcycled chairs. Upcycle Your World, One Project at a Time with this rewarding transformation, and explore more DIY projects to enhance your home improvement journey!
Conclusion
By following these steps, you’ve not only given your plastic wicker chairs a new lease on life, but you’ve also gained valuable experience in DIY projects. This project is an excellent addition to your home improvement skills and a creative way to explore upcycling ideas. Remember, every small step towards upcycling contributes to a healthier planet and a more beautiful home. So keep experimenting, keep creating, and continue to innovate, create, and elevate your surroundings!
Please Note: This post contains affiliate links, which means I may earn a commission if you make a purchase through these links. Your support helps keep this content free. Thank you for your understanding and support! This post contains affiliate links, which means I may earn a commission if you make a purchase through these links. Your support helps keep this content free. Thank you for your understanding and support!


