From Frustration to Flow: Why Drip Irrigation is the Perfect DIY Project for Your Garden
Gardening is one of the most fulfilling home improvement DIY projects you can take on. There’s nothing quite like seeing your garden flourish after the hard work you’ve put into it. However, watering can often become a source of frustration, especially when using inefficient methods like soaker hoses. I’ve been there—dealing with hoses that kink, flood some areas, and leave others dry. After years of struggling, I knew it was time for a change.
That’s when I discovered drip irrigation. This precise, water-efficient solution transformed my garden and saved me time, water, and stress. Plus, it fits perfectly into the growing trend of upcycling ideas, allowing me to reuse old materials and enhance my home improvement efforts.
In this post, I’ll walk you through why drip irrigation is the perfect solution for your garden and how you can set it up yourself as part of your next DIY project. By the end of this guide, you’ll be ready to innovate, create, and elevate your outdoor space.
Why Drip Irrigation is the Ultimate DIY Home Improvement Project
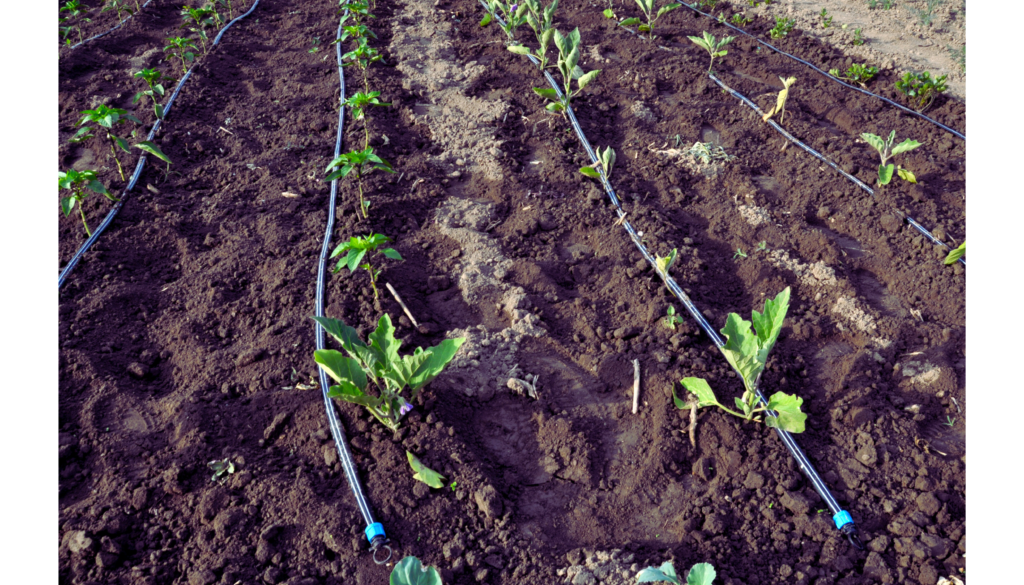
If you’re looking for a home improvement project that blends sustainability and efficiency, drip irrigation is the way to go. Unlike traditional sprinklers or soaker hoses that waste water through evaporation and runoff, drip irrigation delivers water directly to the roots of your plants, ensuring they get exactly what they need. This results in healthier plants, less water waste, and a garden that thrives.
Incorporating a drip irrigation system into your home improvement plan also offers opportunities for upcycling ideas, like reusing old hoses or containers, which can reduce your environmental impact. Whether you’re an experienced DIY enthusiast or a gardening newbie, drip irrigation is a rewarding project that will take your garden to the next level.
Materials Needed for Your Drip Irrigation System
Before you dive into this home improvement project, gather the following materials:
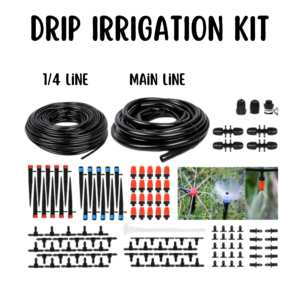
- Drip irrigation kit (including mainline hoses, emitters, connectors, and stakes)
- Pressure regulator (to ensure the right water pressure)
- Backflow preventer (to stop contaminated water from flowing back into your household supply)
- Filters (to prevent debris buildup and clogging)
- Timer (optional but highly recommended for automation)
- Scissors or tubing cutters
- Extra Main Line Hose. (optional) If you run out of mainline.
- Extra Emitters. (optional) If needed. These were easy to attach.
- Garden layout sketch (for planning the system)
Please Note: This post contains affiliate links, which means I may earn a commission if you make a purchase through these links. Your support helps keep this content free. Thank you for your understanding and support!
How to Set Up Your Drip Irrigation System: A Step-by-Step Guide
 Now that you have everything you need, let’s walk through the steps to install your drip irrigation system, turning this home improvement project into a seamless experience.
- Design Your Layout
The first step to any successful DIY project is careful planning. Before you begin installation, sketch out your garden. Identify where your plants are, and group those with similar watering needs together.
Make a detailed diagram that shows where you want to place the mainline hose, lateral lines, and emitters. Consider sun exposure and plant types, as those in full sunlight will require more water than those in partial shade.
- Check Water Pressure
Ensuring your water pressure is adequate is essential for the system to work properly. Most drip irrigation systems operate best with pressure between 20-30 PSI (pounds per square inch). If your home’s water pressure is too high, install a pressure regulator. Too much pressure can damage the emitters and lead to uneven water distribution.
- Lay Out Your Mainline Hose
Once your plan is in place, lay out the mainline hose. This thicker hose will run from your water source (usually an outdoor faucet) to the garden bed, acting as the main artery of your drip irrigation system.
- Tip: Run the mainline hose alongside the base of your garden bed, where it can be easily concealed by mulch or other ground cover for a neater look.
- Soften the Tubing for Easier Assembly
As you begin to connect your components, you’ll notice that the tubing can be stiff. For a smoother assembly, dip the ends of the tubing into hot water for a few seconds. This will make it easier to attach the connectors, emitters, and other components.
Types of Emitters for Your Drip Irrigation DIY Project
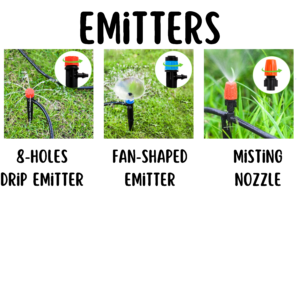
 Choosing the right type of emitter is crucial for delivering water efficiently to your plants. Drip irrigation kits come with a variety of emitters, each designed for specific types of plants and watering needs. Here are a few you might use in your DIY project:
- 8-Hole Drip Emitter
This adjustable emitter allows you to control the flow of water by twisting the red cap. It’s perfect for precise watering in vegetable gardens or flower beds where different plants need varying amounts of water. By directing water straight to the root zone, you can ensure each plant gets exactly what it needs.
- Fan-Shaped Emitter
Fan-shaped emitters are great for covering large areas, such as lawns or large garden beds. These emitters spray water in a fan-like pattern, allowing you to water multiple plants at once. You can adjust the blue cap to control the flow and shut it off when necessary.
- Misting Nozzle
If you’re growing delicate plants like herbs or want to cool your garden during hot days, misting nozzles are a great option. They create a fine mist that keeps your plants hydrated without overwhelming them. You can also install these in greenhouses or attach them to trees for cooling purposes.
Connecting Your Emitters and Lateral Lines
After laying out the mainline hose, it’s time to connect the lateral lines. These thinner hoses (usually ¼ inch) will snake through your garden beds, delivering water directly to each plant.
- Tip: Bury the lateral lines under mulch or ground cover to protect them from the elements and keep your garden looking tidy.
- Install the Backflow Preventer and Pressure Regulator
Attach these essential components to your outdoor faucet before connecting the mainline hose. The backflow preventer ensures that contaminated water doesn’t flow back into your home’s water supply, and the pressure regulator reduces water pressure to a level appropriate for the drip system.
- Space Out Your Emitters
Now that your hoses are in place, it’s time to install the emitters. Place the emitters along the lateral lines based on your plants’ watering needs. Some plants may require more emitters than others, so don’t hesitate to experiment with spacing and flow rate adjustments to find the perfect balance.
Installation Tips for Drip Irrigation
Here are a few more tips to make the installation process go smoothly:
- Start small: If this is your first time setting up a drip irrigation system, start with a small section of your garden. You can always purchase additional ¼-inch lateral lines, emitters, and connectors to expand your system later.
- Automate with a timer: A timer is a great addition to automate your system. This ensures consistent watering even if you’re away, and it helps prevent over- or under-watering your plants.
- Customize for different zones: If you have a large garden with diverse plants, consider installing multiple zones. This allows you to customize the watering schedule and emitter flow rates to suit the specific needs of each area.
DIY Drip Irrigation for Water-Wise Gardening and Upcycling Ideas
Drip irrigation isn’t just an excellent home improvement project—it’s also a great way to incorporate upcycling ideas into your garden. For example, you can use old hoses as lateral lines or repurpose containers for water collection. Embracing these upcycling ideas makes your system even more eco-friendly, reducing both water waste and material waste.
Water conservation is a growing concern, and drip irrigation is an effective solution for saving water. By delivering water directly to the root zone, you minimize evaporation and ensure your plants thrive with minimal resources. Whether you’re setting up your first DIY project or looking to elevate your existing garden setup, this system will help you create a more sustainable and cost-effective outdoor space.
Maintenance Tips for Long-Term Success
Once your drip irrigation system is up and running, regular maintenance is key to keeping it in top shape. Here are a few tips to ensure your system continues to function efficiently:
- Check emitters regularly: Make sure each emitter is delivering water as expected. Emitters can become clogged with dirt or debris over time, so clean or replace them as needed.
- Inspect tubing for leaks: Occasionally check your tubing for holes or leaks, especially around connections. If you notice a leak, cut the damaged section and replace it with new tubing.
- Flush the system: To prevent clogs, periodically flush your system by running water through it without the emitters attached. This will clear out any sediment or debris that may have accumulated.
Conclusion: Elevate Your Garden with Drip Irrigation
Installing a drip irrigation system is a straightforward yet rewarding DIY project that can transform your garden into a water-efficient oasis. Whether you’re a seasoned home improvement enthusiast or just starting out, this project offers the perfect balance of sustainability, efficiency, and creativity.
With careful planning and the right materials, you can “Innovate, Create, and Elevate” your garden, ensuring healthier plants and less water waste. And by incorporating upcycling ideas into your setup, you’ll make your garden even more eco-friendly.
So, why not “Upcycle Your World, One Project at a Time”? Start your drip irrigation DIY project today and enjoy a lush, thriving garden for years to come. “”
Expert Tip: Maximizing the Efficiency of Your DIY Drip Irrigation System
To get the most out of your DIY drip irrigation system, always take into account your garden’s unique layout and plant varieties. Start by grouping plants with similar water needs into zones. This will allow you to tailor your watering schedule and emitter types for each section of your garden. For example, use adjustable 8-hole drip emitters in vegetable beds where precise water control is needed and fan-shaped emitters for larger, hard-to-reach areas like lawns.
Additionally, burying the ¼-inch lateral lines under mulch or ground cover will not only keep your garden looking tidy but also protect the tubing from sun damage, increasing the system’s lifespan. Regularly check your emitters for blockages and leaks, and don’t forget to install a timer for automated watering, ensuring consistent moisture levels even during busy days or vacations. By following these expert tips, you’ll keep your drip irrigation system running smoothly and your garden thriving.
Learn More about Gardening:
The Essential Guide to Gardening: Start Your Garden from Scratch and Watch It Flourish
From Garden to Table: Fresh Recipes Using Your Homegrown Ingredients
Preserving Your Garden Vegetables: Tips, Tricks, and Techniques for Long-Lasting Freshness
Sign up to the newsletter
Powered by EmailOctopus


